오늘은 gradle을 사용한 Spring 환경에서 Swagger을 사용하여 API문서를 자동화하는 방법에 대해 작성하고자 한다.
Swagger란?
Swagger는 Rest API서버 구현 시 사용하는 API 정보를 자동으로 문서화해주는 오픈소스 프레임워크이다.
Swagger을 사용하는 이유?
Swagger을 사용하는 이유는 다음과 같다.
1. 적용하기 쉽다.
- 코드 몇줄을 추가하여 Swagger을 사용 할 수 있다.

2. 테스트를 할 수 있는 UI을 제공해준다.
- API을 테스트 할 때 주로 Postman을 사용하여 테스트를 할 수 있지만 Swagger의 경우 GUI로 테스트를 할 수 있는 환경을 제공한다.

3. 다양한 프레임워크를 지원하여 (Spring, Django, Node.js 등등)
- API서버을 설계 할 수 있는 대부분의 프레임워크에서 사용이 가능하여 협업시 많은 도움이 된다.
gradle을 사용한 Spring환경에서 Swagger 적용하기
1. Swagger을 사용하기 위해 build.gradle파일에 의존성을 추가해준다.
dependencies {
	....
	// Swagger 2
	implementation 'io.springfox:springfox-swagger2:2.9.2'
	implementation 'io.springfox:springfox-swagger-ui:2.9.2'
    }
2. Swagger2Config 클래스를 만들어 Swagger을 설정한다.
import org.springframework.context.annotation.Bean;
import org.springframework.context.annotation.Configuration;
import springfox.documentation.builders.ApiInfoBuilder;
import springfox.documentation.builders.PathSelectors;
import springfox.documentation.builders.RequestHandlerSelectors;
import springfox.documentation.service.ApiInfo;
import springfox.documentation.spi.DocumentationType;
import springfox.documentation.spring.web.plugins.Docket;
import springfox.documentation.swagger2.annotations.EnableSwagger2;
@Configuration
@EnableSwagger2
public class Swagger2Config {
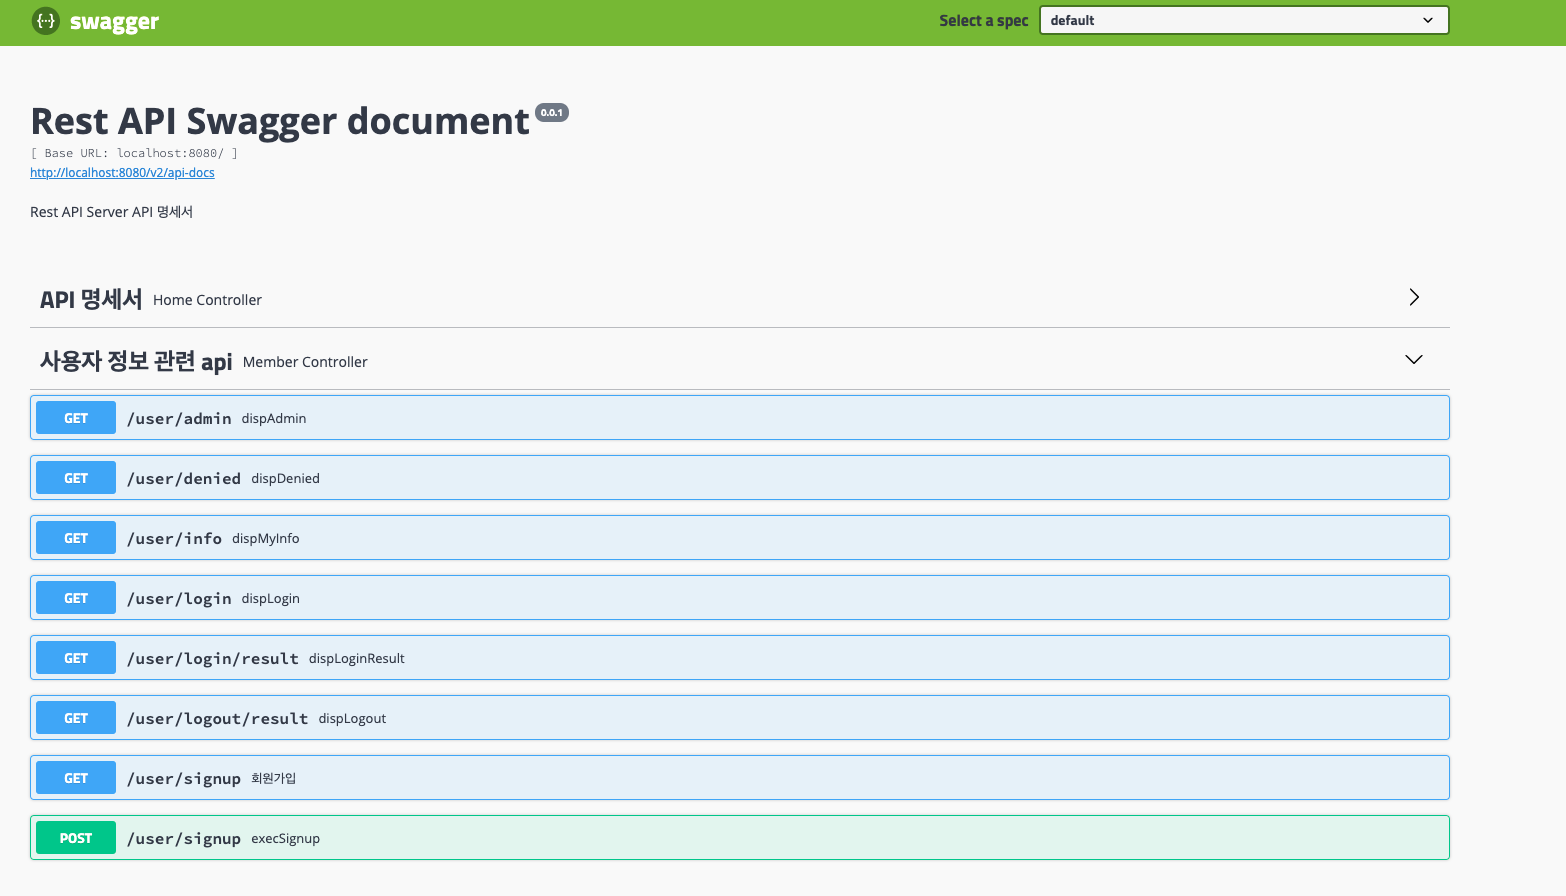
private static final String API_NAME = "Rest API Swagger document";
private static final String API_VERSION = "0.0.1";
private static final String API_DESCRIPTION = "Rest API Server API 명세서";
// Swagger 설정
@Bean
public Docket api(){
return new Docket(DocumentationType.SWAGGER_2)
.apiInfo(apiInfo())
.select()
.apis(RequestHandlerSelectors.basePackage("com.example.api"))
.paths(PathSelectors.any())
.build();
}
//swagger setting
public ApiInfo apiInfo(){
return new ApiInfoBuilder()
.title(API_NAME)
.version(API_VERSION)
.description(API_DESCRIPTION)
.build();
}
}위 코드를 설명하면 다음과 같다.
| Docket api() Docket - Swagger을 설정 할 수 있도록 도움을 주는 클래스이다. select() - ApiSelectorBuilder을 생성하고 apis()와 paths()을 사용 할 수 있게 해준다. apis() - basePackage()을 사용하여 api가 작성된 패키지를 지정한다. - RequestMapping으로 할당된 URL리스트를 추출한다. - basePackage()가 아닌 any()인 경우 모든 패키지에 api정보가 표시 된다. - 위의 코드를 기반으로 설명하면 "com.example.api"패키지에서 사용되는 모든 api들이 표시된다. paths() - apis()로 선택된 api중 원하는 path값을 지정하여 문서화 할 수 있다. - any()값으로 지정되어 있기 때문에 모든 API을 볼 수 있다. - ant("/user/**")으로 지정할 경우 user api들만 필터링 하여 표시된다. |
| ApiInfo apiInfo() ApiInfo - Swagger을 커스텀 하여 지정 할 수 있다. title() - Swagger화면에 나오는 제목을 지정 할 수 있다. version() - API문서에 대한 버전 정보를 지정 할 수 있다. description() - Swagger문서에 부제목을 지정 할 수 있다. -------- 위의 코드에서는 사용하지 않았지만 라이센스 및 작성자 연락처 등을 사용 할 수 있다. |
3. https://ip:port/swagger-ui.html에 접속하여 정상적으로 작동을 하는지 확인한다.
적용 시 발생했던 문제점 및 해결 방법
사실 이 글을 작성하는 이유 중 하나가 Swagger을 적용하면서 발생 했던 문제에 대해 해결하는데 오랜 시간이 걸렸기 때문에
내가 아닌 다른 사람이 Spring환경에서 Swagger을 적용할 때 나와 같은 문제점을 겪었을 때 빠르게 해결하기 바라면서 작성해보았다.
겪었던 문제
1. Swagger을 적용하고 확인을 하려고 하니 정상적으로 표시가 안되고 404 에러가 뜨는 것을 확인하였다.

2. 이후 로그 값을 확인해본 결과 하면에는 다음과 같은 에러 메시지가 표시되었다.

2021-04-12 19:35:09.314 WARN 13851 --- [nio-8080-exec-1] o.s.web.servlet.PageNotFound : No mapping for GET /swagger-ui.html해당 문제를 보고 처음에는 swagger-ui을 불러오는 과정에서 설치가 안되어 있을 수 있다는 블로그의 글을 보고
가장 먼저 swgger-ui가 정상적으로 설치되었는지 확인하였다.
3. 정상적으로 설치된 것을 확인 한 이후 해결법을 찾기 위해 삽질을 한 결과 다음과 같은 해결법을 사용하여 해당 문제를 해결하였다.
해결법
1. WebConfig 클래스를 만들어 다음과 같은 코드를 추가해준다.
import org.springframework.context.annotation.Configuration;
import org.springframework.web.servlet.config.annotation.EnableWebMvc;
import org.springframework.web.servlet.config.annotation.ResourceHandlerRegistry;
import org.springframework.web.servlet.config.annotation.WebMvcConfigurer;

@Configuration
@EnableWebMvc
public class WebConfig implements WebMvcConfigurer {

    ...

    @Override
    public void addResourceHandlers(ResourceHandlerRegistry registry) {
        registry.addResourceHandler("/swagger-ui.html**").addResourceLocations("classpath:/META-INF/resources/swagger-ui.html");
        registry.addResourceHandler("/webjars/**").addResourceLocations("classpath:/META-INF/resources/webjars/");
    }
}